CLASS 47 UPGRADE & A CUSTOM TOOL
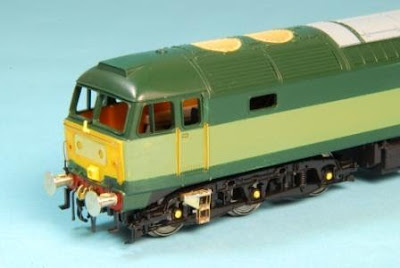
Some projects go through 'the system' quickly, with barely a pause for breath. Others make steady progress over a number of weeks, with a few hours spent every other day tweaking, masking, spraying and finishing. And yet, some modelling tasks can take years to complete, regardless of complexity.
The latter has certainly been the case with a couple of models that have been in and out of my 'in progress' box over the past 2 years. Most notably this Lima-ViTrains hybrid Class 47. The main detailing work was completed in quick time, then came a lull while I waited for a set of etched bogie footsteps (reviewed in Model Rail issue 155). Then the painting process began - into early Railfreight grey livery.
This is when things came to a grinding halt. Who'd have thought that it could take so long to get this last stage out of the way before glazing, reassembly and weathering? The reason is that I've been hanging on in the hope that Shawplan/Extreme Etches bring out one of their superb packs of laser-cut glazing for the Lima 47, as they already have for the Heljan, Bachmann and Vi-Trains versions.
There's no sign of such a pack yet, so this model may have to wait a bit longer...

I still love detailing older bodyshells. Drilling-out the radiator fan grilles can be done quickly with a mini power drill, switching to round sanding drums to create the desired aperture shape and size. Take care though, as the plastic can melt easily due to the friction.
Shawplan offer countless parts for the 47, including a wide choice of headcode/marker light panels. A full range of boiler roof parts are also available to suit the various differences among the large fleet.

The Lima model features solid moulded cab handrails which benefit from replacement with brass wire. However, the recessed cab side handrails can be tricky to cut away, but grinding the tip of a small flat-blade screwdriver to a sharp point will help. Draw the tip over an oilstone, working on both faces of the blade.

The screwdriver can then be used like a miniature chisel to pare away the waste material, leaving a smooth surface. Tidy up with strips of abrasive paper if necessary.

The painting stage has taken an eternity, working around so many other tasks that pay the bills. A white undercoat for the wrap-around yellow ends is essential.



Hi George You once did an article on sanding tools. There was a pencil like tool that took a moveable sanding band. I have one but there is no makers name on it & I wanted replacement bands. Can you point me in the right direction?
ReplyDeleteKind regards
Andy Small
Hi Andy,
DeleteTry Axminster Tools: www.axminster.co.uk
I think they were called Detail Sanding Pens and the abrasive strips are available separately.
All the best,
George.