WD LOCO IN THE PAINT SHOP
Mercian Models kit receives a wartime finish

I always enjoy priming a newly built kit as, once the dull grey paint starts to dry, all those hours of hard work start to feel like they've been worth it. All those bits of metal or plastic that have been stuck together suddenly begin to look like a real train. It took a couple of separate applications of primer until I was happy, adding filler here and there to tidy up some gaps and imperfections in the bodywork. Only once I was sure that the surfaces were perfect did the painting continue.
Having enjoyed working with Tamiya paints on my recent foray into Airfix military kits, they were pressed into service again here, following the same pattern of pre-shading the model before the livery coats were applied. A variety of olive green shades were built up with the airbrush, creating highlights and lowlights as well as giving the bodywork a more lived-in appearance. After all, I wanted to portray a locomotive that has not only crossed the English Channel in harsh conditions but also one that has been working hard on newly liberated French soil.
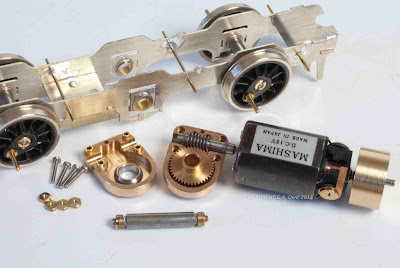
There's still much to do before the painting stage is complete, then the chassis can be assembled and the mechanism put through its paces. So, I'd better get back to work...!


http://en.wikipedia.org/wiki/File:Wd-040dm-grumpy-goods-bitton-2013.jpg
ReplyDeleteFrom Avon Valley web site
Curious to know if you used the Halfords rattle can for applying the primer or the airbrush. I have three whitemetal kits ready for priming and have used the Halfords primer in the past. However, on the basis one of the locos is a K's kit of a GWR 97xx bought on ebay and detailed up with lost wax weir pump and all associated pipework etc which I thought might need a more delicate touch you get with an airbrush so bought some Alcad to apply. Any thoughts would be welcome. Many thanks. Bob
ReplyDeleteHi Bob, I used Alclad primer through an airbrush - it's much easier to control where the paint is going - and how thickly it's being applied, especially in and around the details. However, it must be applied to bare metal or plastic, or it will crack any existing paints.
DeleteMany thanks for the info, which is much as I thought. Bob
DeleteAs an absolute die hard shunter fan, i am loving this build!! It looks brill already! Cant way to c it with all the trimmings added!
ReplyDeleteCud i ask u a question?? Where can i buy coupling links from to add to my models?? Ive never come across them other than extra detailing parts that come with a new model?? Cheers
Thanks Matthew. Smiths do a great range of screw-link and 3-link couplings for locos and rolling stock, available from a range of model shops or www.mainlytrains.co.uk. YOu can buy them ready-assembled or the cheaper DIY versions.
DeleteCheers,
George.